

What's that in my cart?- Ordering 101
One question we get a lot around here is how do I order? With a close second being I added fabric to my cart but now theres something extra in there what do I do?
So we decided it was time to put out a blog explaining exactly how to order some of our AMAZING custom fabric and panels as well as share why the site is set up the way it is. 💕
First things first.... When we went to custom printing our fabric there was a bit of a learning curve on how exactly to share that we can print all the FABULOUS designs and panels on a bunch of different bases. Do we create a listing for each design on a seperate base? Well that could get confusing and would be a HUGE selection to scroll through to find exactly what you are looking for. Do we only offer panels printed on white? That would definitely make the process a bit less confusing, but then you wouldn't be able to get the AWESOME unique designs you want to make that PERFECT piece you have been dreaming of.
The AMAZING Brandi spent a LOT of time trying to figure out the exact right way to set everything up to make it so we have the ability to not only get the designs we want printed on the bases we want, but we can go a bit further and customize them to be exactly what we envisioned. While it can be a bit confusing the first time you see the site and start to order we promise that once you get the hang of it you are going to LOVE how FABULOUS it is!! 😍😍😍😍
Now that you know a little bit about the why the website is set up the way it is lets dive into how to order!
Panels:
When ordering panels you will first click on the design you LOVE. By clicking on the design it's going to take you to the screen where the magic happens!

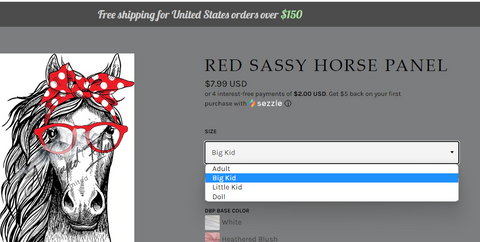
Now that we're on the panel screen we need to decide the panel size we want to get. The sizes are:
Adult- 29" x 36" (10x14)
Big Kid- 19" x 24" (8x12)
Little Kid- 14" x 18" (6x10)
Doll- 10"x10" (3x5)
I'm going to get an Big Kid Sized Panel to make my niece a CUTE sassy horse shirt! So I will click on the drop down box where it says Adult, and changed that to Big Kid:
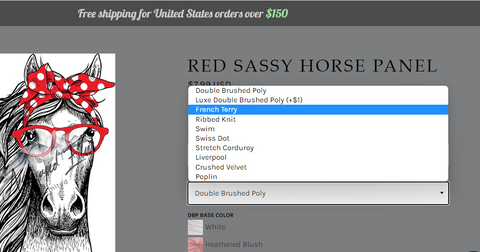
Next I need to decide which base I want my panel printed on. Since I'm going to be making a hooded sweatshirt I'm going to choose French Terry. Click on the box underneath the base lable and switch that to your desired fabric base.
Now that we have our panel size and the correct base we want it printed on we now need to decide what kind of background we want it on. This is where things can get a bit confusing.... You can choose a plain base color, or a printed background, but not both. So if I want the panel printed on Sage French Terry I will click the French Terry Base color Sage:

While I do ADORE our regular base colors I actually want to mix this one up a bit so instead I will be ordering it on a printed background. To do that I need to make sure that my base color is set to white (this is the default selection so if you haven't changed anything with the base colors don't worry about this part):

Now I am going to scroll down to the printed background selection and pick the background I would like my panel to be printed on. My niece LOVES everything Unicorn right now so I'm going to get this printed on the Unicorn background 😍😍😍

Alright so we have our size, our base, and the background we want our panel printed on, all that's left is deciding if we would like a back panel to go with it. I ALWAYS recommend getting a back panel.... There have been a few times where I think I won't use it, and regret snagging one EVERY.SINGLE.TIME!!! I tend to get the size back panel that coordinates with the size front panel I am ordering, but if you are thinking you are going to want a bigger or smaller panel you definitely can mix that up. For example if you are wanting to make a short sleeve shirt for a little one out of all the same fabric, but don't want to purchase a half yard of the design, grab an adult back panel.... There are NO RULES on what size you can order. Just know that the back panel you order will have the same background as the front panel so be sure to click the corresponding one (if ordering a printed background click the printed background back panel selection underneath the background choices etc).

Now all we have to do is click that add to cart button! After you click that and head over to your cart you might be a bit confused by what you see so I wanted to take a second and talk over why your cart has a few extra things added to it:

First you will notice the panel listed with the base (French Terry), the base color (Natural White), the Printed Baground (Unicorn) and that I want a back panel. Note: If you didn't get a printed background you will only see the base color showing. This item is only charging us $7.99 which is the cost of the front panel, but I ordered a back panel how come it's not included? We will get to that in just a second.
Next you will see an item that says White French Terry Panel.... If you look the price is set to $0. This tells Brandi what base you want her to print your panel on, but it is also taking that panel out of our inventory so we don't accidentally oversell them. Please DO NOT remove this as it will thorw the inventory off and could cause things to oversell 😬
Last you will see the Add Printed Back Panel this is where the charge for the back panel comes in and again helps us to keep track of inventory and not oversell. Why doesn't the back panel say what design it needs to be printed on? Well remember on our front panel read out, it states we are getting it printed on the Unicorn background and we want a back panel.... The back panel listed later in the cart is connected to the front panel so now when Brandi goes to print this order she will see that it also needs to be printed with the Unicorn background 😍😍
Fabric:
Now that we know how to order a panel lets order some coordinating fabric to go with it! Since I am getting my panel printed on the Unicorn background I thought it would be CUTE to add in this Irridescent Yardage to add some sparkle to my nieces hoodie!

Ordering yardage isn't quite as complicated as ordering panels can be, but it can still get a bit tricky so thought I would share the process 💕 First we need to decide how much of the fabric we are going to need. I know for my hoodie I am going to want at least 1 yard so I will switch out that 1/2 yard option for 1 yard:

Since I got my panel in French Terry I need to change the base of this yardage to French Terry as well:

Now all that's left is to decide how many yards I need and add it to the cart.... I am just going to get 1 yard this time, but if you need more just change the quantity to the correct number of yards you want. Now that my fabric is loaded into my cart let's chat about what that looks like!

Just like when we ordered our panel we see the item listed with the options we selected: Iridescence Yardage is describing the design we selected and the infinite_options_1: Natural White French Terry is describing the base we selected to get it printed on. If you notice below that there is another item that says FT printing base $0. This again is just for inventory purposes.... If we don't keep track of how much of each base we are selling we could accidentally oversell it and not have enough to complete orders. Please DO NOT delete this from your cart as it helps us and the computer keep track of how much of each base we have sold and what we have left. 💕
The next thing I wanted to share is the notes section....

Say you ABSOLUTELY LOVE a design, but would like something to be a little different.... well Brandi is FANTASTIC and will try and make all your fabric dreams come true, so by putting your request in the notes section she can work on getting you the fabric of your dreams! 😍😍😍 For my order I think I would like the red on the horse to be changed to something that would coordinate a bit better with the Unicorn background I selected so I am going to ask if she can turn it navy!

I like to throw a little love in there to let her know that I really appreciate the fact that she is going above and beyond to help make my order PERFECT!!! If you don't want to switch anything up, but would like to share a little encouragement or silly joke.... drop it in the notes! It always feels AMAZING to make someone smile 😍😍
Last, but certainly not least I want to share about redeeming coupon codes! This part got me a bit at first as you see the discount code section on the main checkout screen. If you put your code in there, but it doesn't seem to be working, then what you are going to want to do is go ahead and click the checkout button.... I promise it's not going to charge you right away, and there is another place we can enter your coupon code before actually checking out!

Now that we are taken to the information screen do you see that little box underneath our order details that says Gift card or discount code? We are going to want to enter our code in there and then click apply. Once you do that your coupon code should be loaded in and you will notice the total change to reflect the new price!! Finish filling in your shipping and billing info, enter in your payment deets, complete your order and all that's left is to stalk your delivery person until it shows up 🥳🥳🥳
Ohh and don't forget to load your cart up, because if you didn't notice at the top of your screen is an AMAZING NEW feature that will tell you how much to add to get FREE SHIPPING!!!! I'm ALL about not paying for shipping so you know I'm going to go back in and add a few more things for a different project 😍😍
I hope this helped clear up any confusion on ordering and explains a bit more clearly why everything is set up the way it is. 💕
xoxo- Melissa 😘