

I'm SEW excited to start sewing up the Harbor Hoodie with you tonight! 😍
*This post contains affiliate links.... They don't cost you anything extra to use, and if you choose to make a purchase after clicking them it helps fund my sewing addiction 🤣😘*
It's Wednesday which means it's time to start sewing up the Harbor Hoodie together!!! This week we are doing things a little differently since this pattern has a few extra steps, so instead of a LIVE we are doing a WEEK long SEW-A-LONG! After you finish reading this blog on how to prep your pattern and fabric join us in the Facebook Group Event (you must already be a member of our Facebook group for that link to work.). If you missed last weeks LIVE sew where we whipped up the Carita Joggers together you can check out the video and the blog post about how to prep and put together patterns HERE.

First lets talk fabrics.... The Harbor Hoodie is an AWESOME wrap sweater that has a lining! What that means is you can tailor it for whatever season you want.... I live in the desert so a winter coat really isn't a MUST HAVE around here. It does get colder during the winter MONTH (yes just 1 month 🤣) here though so I'm thinking a sherpa lined harbor for those days that I need to pop out and it's below 50 degrees will be LOVELY 😍
Fleece, Sweatshirt Fleece, and French Terry would also make nice cooler/cold weather layers! If you're looking for something lighter weight try Double Brushed Poly!! No matter what fabric you choose, just make sure it has at least 25% stretch to it. If you use a fabric with no stretch it's going to be too tight and you'll feel like your wearing a straight jacket instead of a comfy sweater. 😬 Check out all the AMAZING options Ash and Elm has available and Ready to Ship and of course you can't forget about the AMAZING In House Printing Yardage where you can pick any design to put onto whatever base you'd like! I'm getting ALL the fall vibes from the FABULOUS White Buffalo Plaid French Terry that I lined with some plush fabric I had laying around.... talk about warm and comfy 😍😍
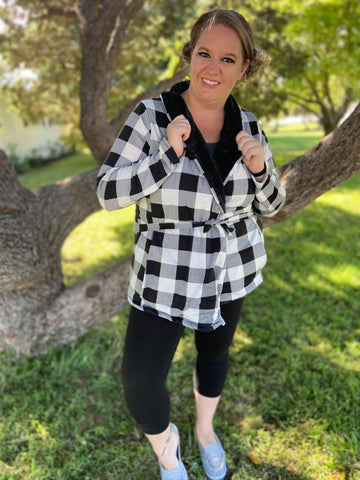

Alright so now that you've got your pattern all put together and picked your fabric you've got to choose if you will be making a collar version or hood. I'm going with the collar version and pockets for tonight!
This hoodie has a LOT of different pieces due to the lining, so I suggest writing out a check list before you start cutting and cross off each piece as you cut that way you don't miss something. ✔
Phew.... let's get prepping
First we need to cut out our main fabric pieces (these will be the pieces on the OUTSIDE of your Harbor:
- We need to cut 2 Front A & B pieces mirror image (I like to just fold my fabric in half and cut both at the same time that way I know they are mirror, but if your fabric isn't big enough for that make sure you either flip the fabric to the other side or flip the pattern for the second piece). If you are doing the hood make sure to follow the big hood line on pattern piece B. If doing the collar follow the piece that curves.
- Cut 2 back A pieces mirrored.
- Cut 1 back piece B.... This piece is cut on the fold so make sure you adjust your fabric properly. If you are tight on space I would cut this piece first!
- Cut 2 sleeves mirror image.
- Cut 4 pockets.... You want 2 sets of pockets that contain 2 pocket pieces that are mirror images. I know this might sound confusing, but all you need to do is fold the fabric in half and cut out the pocket 2 times. This will create the mirror image sets you need!
- If you are making the binding and ties out of the main fabric cut those out now too.
- Cut 2 14" x 2.75" tie pieces
- Cut 1 strap piece:
- XXS-Small: 4" x 2.75"
- M-XL: 5" x 2.75"
- 2x-3x: 6" x 2.75"
- Cut 2 Binding Pieces for either hood or colar. Each size has a different length so make sure to consult the pattern before cutting!
Now we need to cut out the lining pieces:
- Cut 2 Front A and Front B pieces mirrored.
- Cut 2 Back A pieces mirror image.
- Cut 1 Back B on the fold.
- If you want to line your sleeves make sure to cut 2 mirror images of the sleeve pieces as well. If you chose a lining fabric that doesn't have a lot of stretch I would avoid lining the sleeves!
Now that everything is all cut out you are all set to start sewing with us this week! Make sure you pick out a 3/4" button to have as well. If seeing button makes you nervous don't be.... it's completly hidden. If you wanted you could probably even do a KamSnap or hook and eye🤯
I know this might look a little overwhelming with all the pieces and lining, but I promise together we will DO THIS!!! Plus it's really not as bad as it seems 😉😍 and after it's all sewn up you will have the COMFIEST hoodie you've ever owned 💕 PLUS don't forget after we sew everything up tonight you can share your make using #MyAshandElm and be entered to WIN 3 patterns of your choice from Pattern Niche and a $25 store credit to Ash and Elm!!!! If that's not some added motivation I don't know what is 😲
xoxo- Melissa 😘