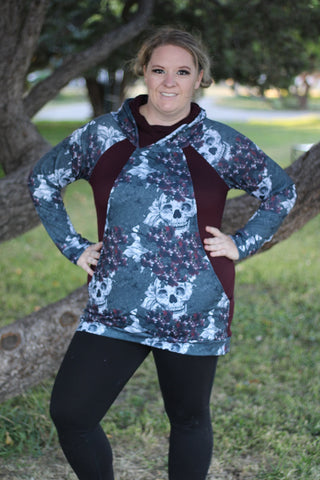
Do you like my Tami??? It has POCKETS!!!!
Sorry for the later blog entry today.... The stomache bug that has been tearing through my house found a new host and it has been kicking my butt 😫I did get a chance to tear myself out of bed long enough to take picture of this AMAZING Big Pocket Tami hack though and had to share it with y'all!!!!
As I was searching the Pattern Niche (aff link) site getting ideas and inspiration I stumbled across an AWESOME hack to make a second front piece to use as a GIANT pocket!!!! 🤯 Not only did I LOVE the idea of a huge pocket, but I really LOVED the look that it created. It was a PERFECT way to color block the Tami without having to mess with pattern pieces too much. I grabbed some of the FABULOUS Floral Skulls (aff link) which paired PERFECTLY with the RTS Merlot Double Brush Poly (aff link) that I had and went to work. You can find the original hack HERE in case you want to check it out for yourself! Just a heads up.... If you click on or use any of my affiliate links they don't cost you anything extra, and if you decide to make a purchase using them it helps me support my sewing and fabric addictions. 😘

First things first you need to cut out the pattern. Cut the whole thing the way you normally would- 1 front, 1 back, sleeves, hood(s), cuffs, and bottom band. Once you've got that you are going to lay out the fabric you want for your pocket piece. Lay your front piece over top (or if you are projecting put the front piece over the fabric you are using) and starting where the zipper mark is you will cut down curving towards the side until you reach where you want your pocket depth to be. *Next time I do this hack I will probably actually start closer to halfway into the zipper mark closer to the shoulder. I would prefect the space at the top of the sweatshirt to be smaller.*


Next lay your piece on your front to make sure you like the placement of the curve. Make sure that you have at least 4-5 inches that match up at the sides towards the bottom or you wont have a very deep pocket. Once you get things adjusted just the way you like it you need to fold the edge of your pocket piece in about 1/2" and hem. *Next time I do this hack I will probably bind the pocket piece instead of hemming it. I think it would make the next step a bit easier*

Now mark where you want your pocket opening to start. I found that folding the piece in half to helped to make sure the marks were even. Then comes the tricky part and why I think using binding would be better than hemming. You need to lay your pocket piece back ontop of your front piece and sew from the top all the way down to where you marked your pocket opening. If you hemmed it you want to get right in those same stitches, I am not nearly as skilled on my coverstitch as I would like to think so this was a bit tricky for me. It doesn't look horrible if you don't get in those stitches, but I think if you used binding it would be a bit more forgiving!


Now just finish up your Tami the way you normally would making sure what you sew up the sides that you catch the pocket layer as well as the front piece! Keep a special eye on the pocket piece when adding the bottom band as well because you want to make sure it is fully attached on the bottom or anything you put into it will fall right out 😬
This hack is an AWESOME one to try if you are just getting into hacking patterns as it doesn't require you to do anything crazy to the main pieces. The trickiest part really is just making sure you sew in those hem lines when you attach it to the front! I can't wait to see your Giant Pocket hacks! If you make one up share it in our Facebook Group so we can all admire your work 😍

xoxo- Melissa 😘
