

52 Week Sewing Challenge: Week 46- Sew Something for the Kitchen
When I saw this weeks 52 Week Sewing Challenge challenge I knew immediately what I wanted to stitch up! I've been eyeing 👀 the Annie Apron from Made for Mermaids* ever sincce it was released. I've wanted to sew it up, but keep putting it off because I'm not really sure who I would sew it for. My boys all have aprons they've gotten from various people throughout the years, and to be honest most of the time they don't even use them so sewing it up for one of them seemed a little pointless. PLUS I really wanted to do the gathered skirt version because it is SO CUTE 😍😍😍😍
That's why when I saw this weeks challenge I said "Heck with it, I'm sewing it up anyways". I am so so happy I did!!! Not only am I now OBSESSED with this apron, but I am desperately searching for a pattern just like it in my size because this is a STRONG NEED in my life right now 🤣🤣🤣

I started my search for the PERFECT materials in the FLANNEL/WOVEN'S* section of the website and once my eyes landed on the Navy inspiration took over and a vision started to appear! I grabbed a yard and then hunted through my stash for the perfect Chrismasy coordinate, and after a quick trip to the store to grab some white glitter ribbon and glitter rick rack that vision was becoming more and more clear. I had some of this irradescent HTV I'd grabbed a while ago and did a quick search for the PERFECT image and voila I knew EXACTLY what I wanted to do!!

My biggest problem with this pattern is that it's not Projector friendly.... I have been spoiled by my projector for so long that now anytime I need to tape a pattern together I avoid it like the plague. I just learned about an AMAZING program called PDF Stitcher and decided I would give it a try and see what I thought. It's completely FREE and was created by a fellow sewist who I'm guessing is like me and HATES taping patterns together 🤣 I was SHOCKED at how easy it was to use. I had to play around with the settings a bit, and since the pattern isn't meant for projectors the lines were pretty thin, but I didn't need to tape anything together so I was one happy camper! 😍

The first thing I needed to do was hem the raw edges of the ribbon to that they didn't fray with use. I used 1.5" ribbon, and after I got it all sewn up and tried putting it on my mannequin I think next time I would rather just make straps with fabric. The ribbon seems a bit too stiff for my preference. I'm sure if I had gone with a more silk ribbon and not a glitter one it would be a different story, but the next one I attempt I'm going to try just making this part.

Once I got the ribbon ready and attached to the bodice I decided I added the glitter rick rack to it. I've never used rick rack before so was a little nervous, but it was so easy to do. Originally my plan was to just put it on the bodice, but I had enough left over and it was so easy that I decided I would try and add it to the skirt portion as well!

Now it was time to add the sash portion to the bodice. This was a little complicated and the directions confused me for a bit. Next time I make this I will not only fold and press the back portion of the sash up a 1/2", but I think I will hem it down as well. It was a bit tricky making sure it got attached correctly on the last step and I think if I had hemmed it I wouldn't of missed a portion of the back piece and it would of looked a bit better.

Now that the bodice is done it was time to tackle the skirt. The say to use 2 gathering stitches and I would definitely reccomend that you follow that instructions. It's a LONG gathering space and having that backup stitch definitely helped when I accidentally pulled the first gathering stitch a little too much and it started to come undone. 😬
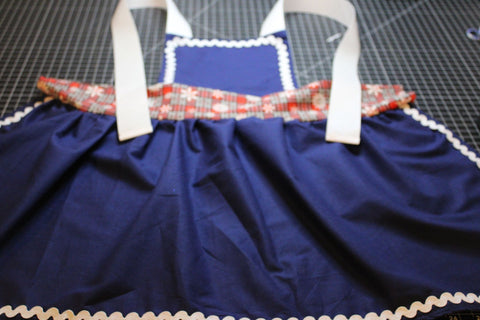
Attaching the skirt to the bodice wasn't tricky at all and I'm so glad that this cotton woven was a DREAM to sew up! Usually when sewing wovens on my serger I have to play around with tensions which I hate to do because then I have to play around with them again to get them back to normal. My machine didn't even bat an eye when I put this through it though which is pretty abdnormal because usually it is a grumpy fussbucket anytime I do something out of the norm. 😫🤣

Next it was time to do the ties. I did everything on my serger because I try to avoid the switching between machines as much as possible during a project. I just sewed the two long edges and one short edge, turned it right sides out but didn't pull the corners all the way out so they could make that cute point at the end. Then I top stitched it all to make sure they didn't come out!

Adding the ties was surprisingly easy given that the sash bit was a bit complicated. I LOVED the pictures in the tutorial, they were such an awesome visual to help me picture exactly what I was supposed to do. After the ties you are supposed to topstitch the back sash onto the apron which is where I think hemming it before hand would of been a lot easier. I missed a good chunk of mine and had to go back with my regular sewing machine to make sure it got tacked down 😔

I found this ADORABLE cut out on my Cricut and knew it would be PERFECT! I am so in LOVE with this apron and can not wait to see a special little one using it to help make some Holiday Treats this year! 😍


Are you following along with the 52 Week Sewing Challenge at all? What did you make for this week??
xoxo- Melissa 😘